Lesson 5: Creating Microsoft Access Queries
You can use a query to view a subset of your data or to answer questions about your data. For example, if you want to view a list of student names and email addresses, but you do not want to see addresses and other data, you can create a query that displays the student’s first name, last name, and email address only. Alternatively, if you want to know which students live in DE, you can restrict your list to those students. This lesson teaches you how to create a query.Open Tables or Queries in Query Design View
A query can be based on tables or on other queries. To create a query, you open the tables or queries on which you are going to base your query in Query Design view, and then use the options in Design view to create your query. You then click the Run button to display the results. You can save queries for later use.To open tables or queries in Query Design view:
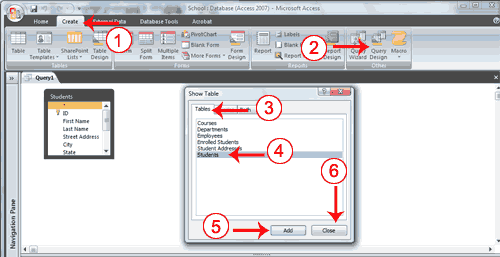
- Activate the Create tab.
- Click the Query Design button in the Other group. The Show Table dialog box appears.
- Activate the Tables tab if you want to base your query on tables, activate the Queries tab if you want base your query on queries or activate the Both tab if you want to base your query on both tables and queries.
- Click to choose the table or query on which you want to base your query.
- Click Add. The table appears in the window.
- Click to choose the next table or query on which you want to base your query.
- Continue clicking tables or queries until you have all the tables and queries you plan to use.
- Click Close. Access changes to Query Design view.
Display All Records and All Fields
In Query Design view, each table has an option that allows you to display all of the fields and all of the records in a table. This option appears on the field line on the drop-down menu as the table name followed by a period and an asterisk (tablename.*).To display all records and all fields:
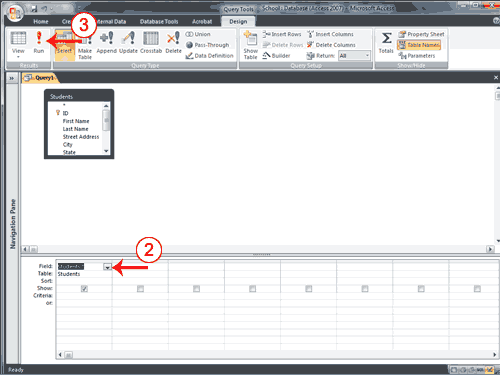
- Open a table or query in Query Design view.
- Click the down-arrow in the first field on the Field row and then select the tablename.* option. The table name appears on the table line.
- Click the Run button. Access retrieves all of the fields and records for the table and displays them in Datasheet view.
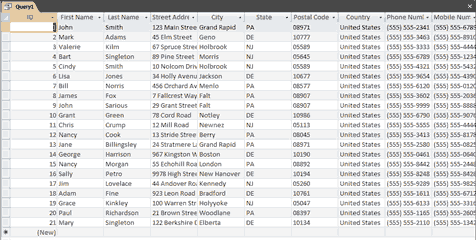
Change from Datasheet View to Query Design View
After you run a query, you can easily change back to Query Design view and make modifications to your query or create a new query.To change to Query Design view:
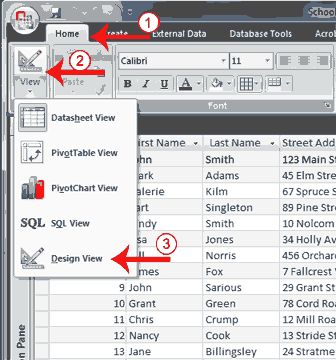
- Activate the Home tab.
- Click the down-arrow below View in the Views group. A menu appears.
- Click Design View. Access changes to Query Design view. You can modify your query.
Retrieve a Single Column
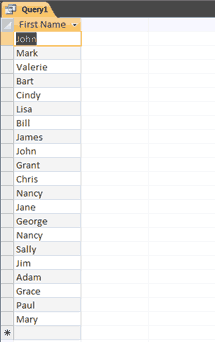
You can use an Access query to retrieve a single column of data. Instead of choosing the tablename.* option on the Field line in Query Design view, choose the name of the field you want to retrieve.To retrieve a single column:
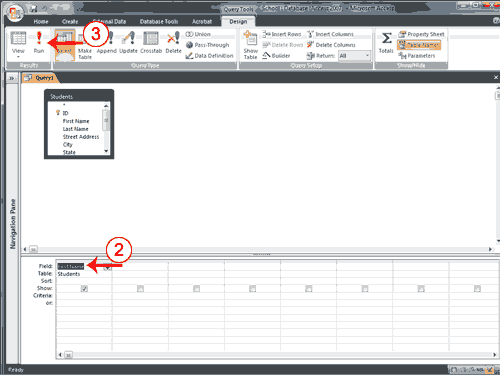
- Open a table or query in Query Design view.
- Choose the field name you want to display in the field line.
- Click the Run button. Access retrieves the column you chose.
Retrieve Multiple Columns
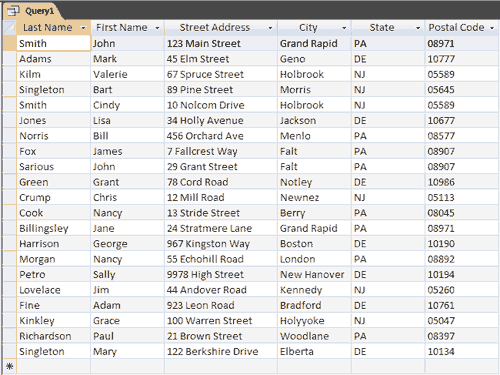
You can use an Access query to retrieve multiple columns of data. On the Field line in Query Design view, choose the field name of each field you want to retrieve in the order you want to retrieve them.To retrieve multiple columns:
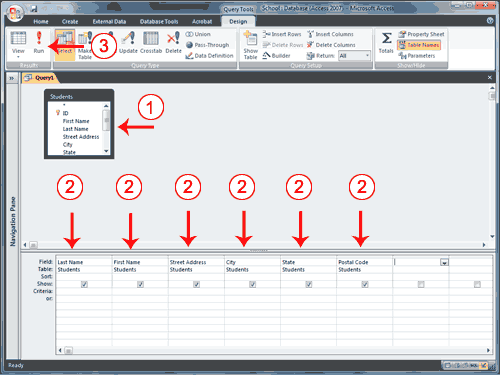
- Open a table or query in Query Design view.
- Choose the field names you want to retrieve in the order you want to retrieve them.
- Click the Run button. Access retrieves the columns you chose.
Sort a Query
When creating a query, you can sort the rows you retrieve in ascending or descending order by choosing the option you want on the Sort row in Query Design view.To perform a sort:
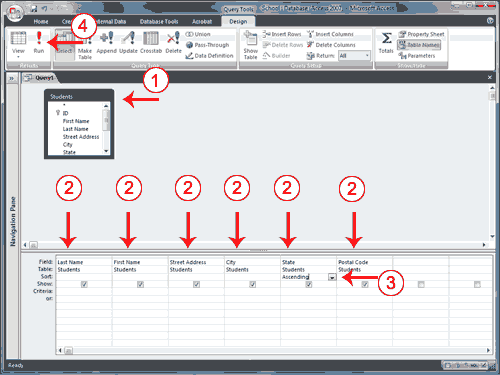
- Open a table or query in Query Design view.
- Choose the field names you want to retrieve in the order you want to retrieve them.
- Under the field you want to sort, click the down-arrow and then choose Ascending or Descending.
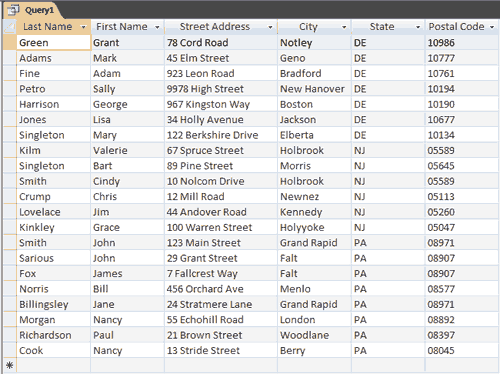
- Click the Run button. Access retrieves the columns you chose and displays the rows in the order you specified.
Sort Multiple Columns in a Query
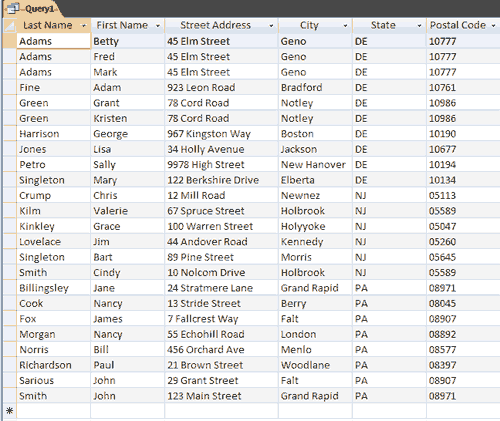
As you learned in the previous section, you can sort the rows your query returns. You can also create sorts within a sort. For example, you can sort by state and then within a state, you can sort by last name and then by first name. You specify the sort in the order you want the sort to occur. If you want to sort by state and then by last name within a state and then by first name within last name, you enter the sort in the following order: city, last name, first name. Your sort order may not agree with the order in which you want to display fields. In such a case, you can use fields that do not display to enter your sort order. To prevent a field from displaying, deselect the Show box on the Show row.To sort multiple columns:
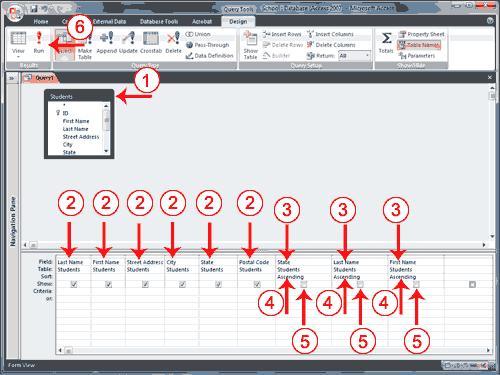
- Open a table or query in Query Design view.
- Choose the field names you want to retrieve in the order you want to retrieve them.
- Choose the field names you want to sort by in the order you want to sort.
- Under the fields you want to sort by, choose Ascending or Descending.
- Deselect the Show button for the columns you do not want to display.
- Click the Run button. Access retrieves the columns you chose and displays the rows in the order you specified.
Retrieve Specific Records
In the examples so far, you have been retrieving all of the records (rows) in your table. You can, however, specify which records you wish to retrieve. For example, you can retrieve only those students who live in DE, only the student whose student number is 5, or only those students whose birth date is 2/16/88.You use logical operators such as = (equal), <> (not equal), > (greater than), or < (less than) to restrict the records you retrieve. For example, if you only want to display students who live in DE, enter = "DE" in the State column on the Criteria line. Access will only retrieve records where the value in the State column is equal to DE. Selection criteria are not case-sensitive, so Access will retrieve records where the entry is DE, de, De, or dE.
| Logical Operators | |||
| Operator | Meaning | Field Type | Entry Format |
| = | Equal to | Character Number Date |
= "DE" = 5 = #2/16/88# |
| <> | Not equal to | Character Number Date |
<> "DE" <> 5 <> #2/16/88# |
| > | Greater than | Character Number Date |
> "DE" > 5 > #2/16/88# |
| >= | Greater than or equal to | Character Number Date |
> = "DE" > = 5 > = #2/16/88# |
| < | Less than | Character Number Date |
< "DE" < 5 < #2/16/88# |
| <= | Less than or equal to | Character Number Date |
<= "DE" <= 5 <= #2/16/88# |
| In | Equal to any item in a list | Character Number Date |
In ("DE", "NJ") In (5, 9, 17) In (#2/16/88#, #2/3/90#, #12/15/88#) |
| Not In | Not equal to any item in a list | Character Number Date |
Not In ("DE", "NJ") Not In (5, 9, 17) Not In (#2/16/88#, #2/3/90#, #12/15/88#) |
| Between | Between two values, greater than or equal to one and less than or equal to the other |
Character Number Date |
Between "C" And "F" Between 5 And 10 Between #1/1/88# And #12/31/88# |
| Not Between | Not between two values | Character Number Date |
Not Between "C" And "F" Not Between 5 And 10 Not Between #1/1/88# And #12/31/88# |
| Is Null | The value is missing from the field | Character Number Date |
Is Null Is Null Is Null |
| Is Not Null | The value is not missing from the field | Character Number Date |
Is Not Null Is Not Null Is Not Null |
| Like | Like a specified pattern. * means any series of characters. ? means any single character. |
Character Number Date |
Like "S*" Like "1*" Not Applicable |
| Not Like | Not like a specified pattern. * means any series of characters. ? means many single character. |
Character Number Date |
Like "S*" Like "1*" Not Applicable |
To retrieve specific records:
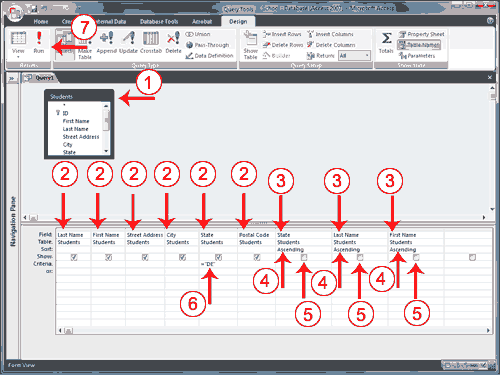
- Open a table or query in Query Design view.
- Choose the field names you want to retrieve in the order you want to retrieve them.
- Choose the field names you want to sort by in the order you want to sort.
- Under the fields you want to sort by, choose Ascending or Descending.
- Deselect the Show button for columns you do not want to display.
- Enter your selection criteria on the Criteria line.
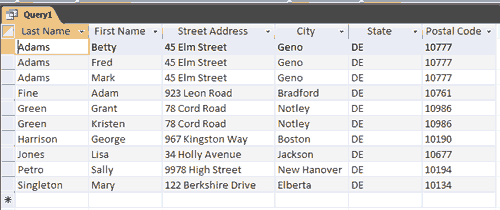
- Click the Run button. Access retrieves the columns you chose and displays the rows in the order you specified.
Apply Multiple Criteria
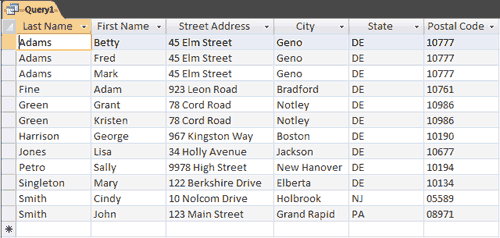
You can apply multiple criteria to the same table. If you place two criteria on the same line, Access will only retrieve records where both criteria are met. For example, if you want all records where the State is equal to "DE" and the Last Name is equal to Smith, you would set the State field to = "DE" and the Last Name field to = "Smith" and you would place both criteria on the same line.If you place one set of criteria on the Criteria line and the second set of criteria on the Or line, Access will retrieve records if either criteria are met. For example, you want all records where the State is equal to "DE" or the Last Name is equal to Smith. You would set the State field to = "DE" and the Last Name field to = "Smith" and you would place one set of criteria on the Criteria line and the other set of criteria on the Or line. Access will bring back all records where the state equals DE and all records where the Last Name is equal to Smith no matter what the State is. You can add additional and and or statements by using the lines below the Or line. For And clauses, place the criteria on the same line; for Or clauses, place the criteria on separate lines.
To apply multiple criteria:
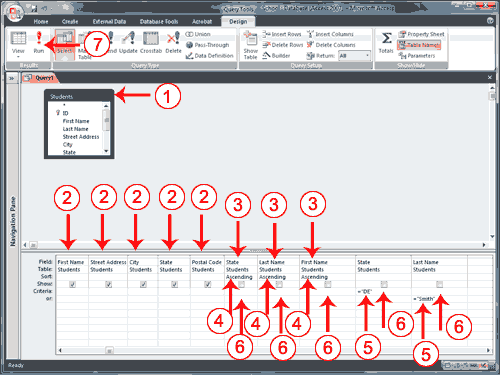
- Open a table or query in Query Design view.
- Choose the field names you want to retrieve in the order you want to retrieve them.
- Choose the field names you want to sort by in the order you want to sort.
- Under the fields you want to sort by, choose Ascending or Descending.
- Enter your selection criteria on the Criteria line and the Or line, as needed.
- Deselect the Show button for columns you do not want to display.
- Click the Run button. Access retrieves the columns you chose and displays the rows in the order you specified.
Create a Query That Uses Two or More Tables
If you want to view data from two or more tables or queries, you can create a query that pulls the data from multiple tables or queries. The tables and queries from which you pull your data should have a relationship.To create a query that uses two or more tables:
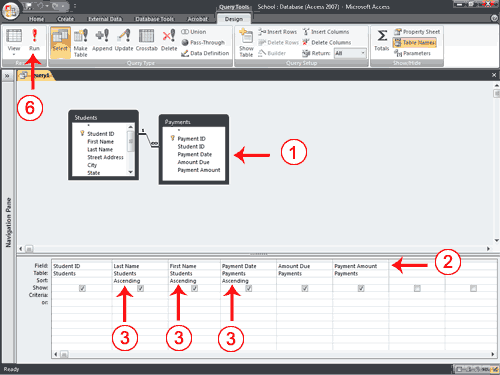
- Open the tables and/or queries you want to use in Query Design view.
- Choose the field names you want to retrieve in the order you want to retrieve them.
- Choose the field names you want to sort by in the order you want to sort. Under the fields you want to sort by, choose Ascending or Descending.
- Enter your selection criteria, if necessary (Not applicable in this example).
- Deselect the Show button for columns you do not want to display (Not applicable in this example).
- Click the Run button. Access retrieves the columns you chose and displays the rows in the order you specified.

Save a Query
After you create a query, you can save it. You can rerun a saved query at any time. If you change the data on which the saved query is based, you will see the changes when you rerun the query.To save a query:
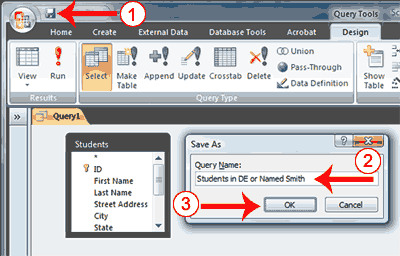
- Click the Save button on the Quick Access toolbar. Access saves the query unless you are saving for the first time. If you are saving for the first time, the Save As dialog box appears.
- Type the name you want to give your query.
- Click OK. Access saves the query. You can now access the query by using the Navigation pane.
Modify a Query
Once created, a query can be modified. Simply open the query in Query Design view and make the changes. You can add columns, change the sort order, change the criteria, and make other changes.In Query Design view, the Query Setup group offers several options that can assist you. Use the Insert Rows button
Use the Insert Columns button
Use the Delete Rows button
Use the Delete Columns button
Use a Query to Make a Table
You can use a query to create a table. This is useful when you want to create a new table that includes the fields and data from an existing table.To create a table:
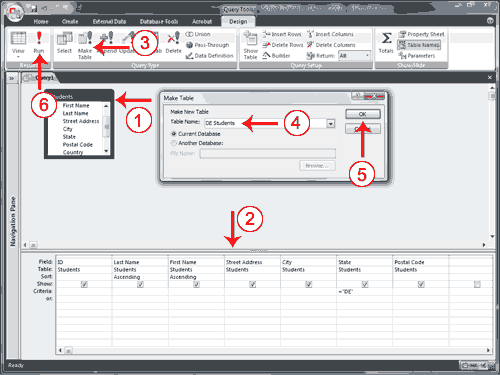
- Open the table or query on which you want to base your new table on in Query Design view.
- Enter the criteria on which you want to base your new table.
- Click the Make Table button. The Make Table dialog box appears.
- Type the name you want to give your new table.
- Click OK.
- Click Run. You see the following prompt.

- Click Yes.
- Close the query. (Right-click the query’s tab and then click Close.)
- Double-click the new table’s name in the Navigation pane to view the new table.
Create a Parameter Query
If instead of entering predetermined criteria, you want to prompt users when a query runs, you can create a parameter query. You create a parameter query by enclosing a question in square brackets ([]). For example, if you want to create a parameter query that asks users which State they want to use from the Student’s table, you would type [Which State?] on the Criteria line under the State column. When the query runs, Access will prompt the user for the answer to your question.To create a parameter query:
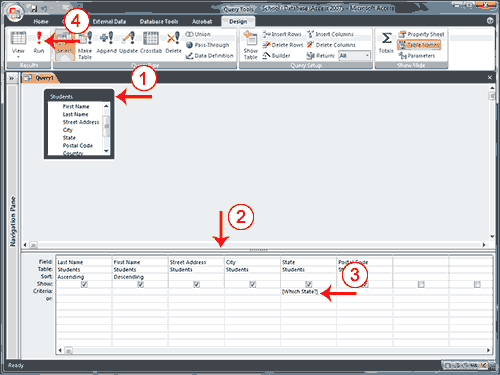
- Open a table or query in Query Design view.
- Create your query.
- On the Criteria line, type the prompt within square brackets.
- Click the Run button. Access prompts you.
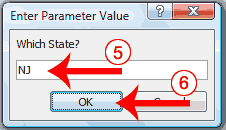
- Respond to the prompt.
- Click OK. Access displays the results of your query in Datasheet view.

Like "*" & [Prompt] & "*" |
Returns all records that contain the value you enter. Example: If you enter ad, Access returns all records that include the sequence ad anywhere in the field. |
| Like "*" & [Prompt] | Returns all records that end with the value you enter. Example: If you enter S, Access returns all records that end with S. |
| Like [Prompt] & "*" | Returns all records that begin with the value you enter. Example: If you enter S, Access returns all records that begin with S. |
| > [Prompt] Note: You can also use < (less than) ,<= (less than or equal to) >=, >= (greater than or equal to), or <> (not equal) |
Find all records with a value greater than the value you enter. Example: If you enter 5, Access returns all records that are greater than 5. |
Ms Office Tutorials Learn Ms Word.Excel,Powerpoint,Access.Windows Xp,Windows 7 And Windows 8: Ms Access Lesson 5: Creating Microsoft Access Queries >>>>> Download Now
ReplyDelete>>>>> Download Full
Ms Office Tutorials Learn Ms Word.Excel,Powerpoint,Access.Windows Xp,Windows 7 And Windows 8: Ms Access Lesson 5: Creating Microsoft Access Queries >>>>> Download LINK
>>>>> Download Now
Ms Office Tutorials Learn Ms Word.Excel,Powerpoint,Access.Windows Xp,Windows 7 And Windows 8: Ms Access Lesson 5: Creating Microsoft Access Queries >>>>> Download Full
>>>>> Download LINK Vv